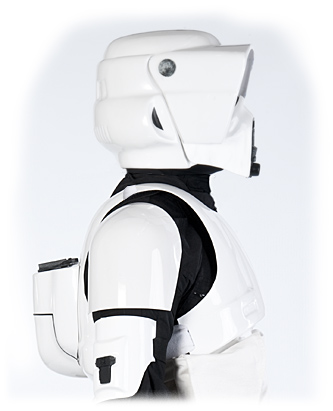
The Chest/Back
To sculpt the chest and back armor you'll need either an upper bodycast of a person, a mannequin that's similar to the final size of the wearer, or a lot of time to custom sculpt a mold on your workbench.
We did ours the hard way. We hand sculpted ours from measurements on our workbench. We knew how large existing scout armors made by fans were already by taking measurements of some at local sci-fi conventions. We then proceeded to take those measurements, adjust them to our liking and sculpt out the chest and back armor.
The Chest
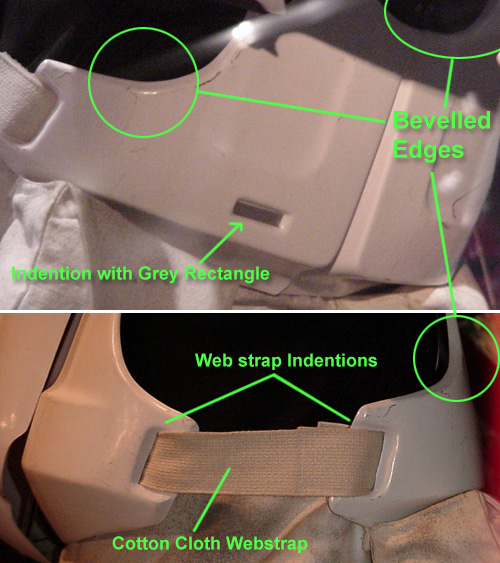
There is a V-shaped trough running down the center of the chest from the neckline to the bottom. On each side of this trough is a 1.2 inch wide flat area that recesses down where the pectorals would be. This flat area is also present along the bottom of the chest plate, but blends with the sides of the chest plate about 3 inches short of the edge. The entire chest has bevelled edges running along the outside edges, as does the back plate.
There is a rectangular indention in the lower right side of the chest. A swatch of grey color resides of the flat area of the recess. The grey should have a slight blue-ish tint to it, but not overly dark. I used Testors Model Masters "Medium Grey" paint for my swatch of color, but flat grey primer works in a pinch if you have it on hand and do not want to spend the money. Depends how detail oriented you want to go. Grey is grey for most people, but others are more 'hardcore' about color.
On each side of the chest, in the under arm area, there is squarish indention with 1-x-1/8 inch slots cut into the plastic. The side-straps that connect the chest plate to the back plate go through these slots.
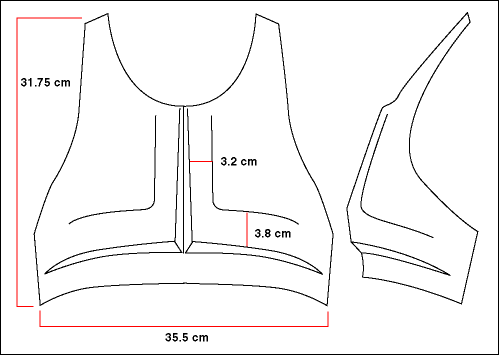
Our chest measures, 35.5 cm wide, 31.75 cm tall, 15.25 cm wide neck opening. The flat areas in the chest going vertically (up and down ) are 3.2 cm wide. The horizontal flat areas are 3.8 cm wide.
You will probably want to refer to our plaster casting , vacuumforming sections, and fiber-glassing to make your final parts.
The Back
The Back Armor has a 2 inch wide raised area along the bottom and a raised flat area going up the middle of the back to the neck line. There is a detachable armored "Hump" on the back plate that is trimmed to slip over the raised middle area (see photo reference section). Like the chest plate, an indented area with cut-slots is present for the web strap in the under arm areas.
The back measures 14 inches wide (35.5 cm), 15.5 inches (39.5 cm) tall and the hump was 8.5 inches (21.5 cm) tall.
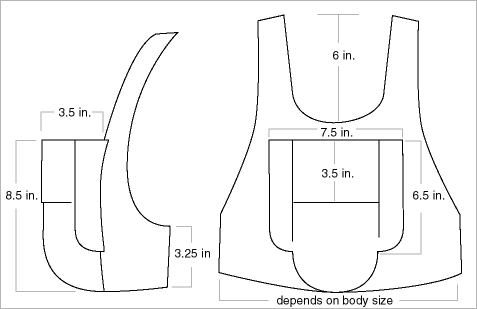
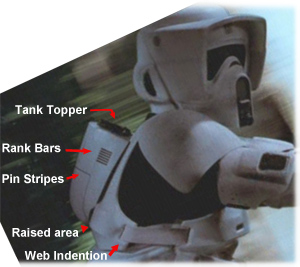
The Back Hump is a separate piece and has a black "Tank Topper" riveted to the top it and black pinstripes detailing the sides of the hump.
The resin Tank Topper is secured to the middle of the hump with a rivet, equal distance from the hump edges, has a 1/16 inch wide red pinstripe tape applied to one of the top flat edges of what the fans call the "gas cap",and a white circle on the round part. There is another circle piece and two curved piece in the hump that are sourced from a Tamiya Flakpanzer Gepard 1:35 scale model tank.
Rank Bars are applied to the upper right side of the hump, and 3 pin-stripe lines decorate the lower half of the hump. You can have either 6 rank bars (3/16 inch thick, 1.5 inches wide) -or- 4 bars (1/4 inch thick, 1.5 inches wide). Note: The "promotional" costume had a grey square in place of the horizontal bars. See the Reference Pictures section for pinstripe placement.
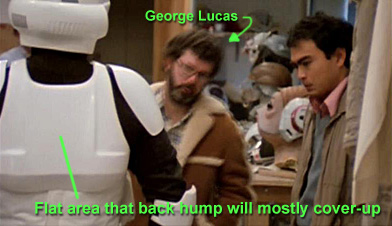
Screencapture image from the "Making Magic" CD-ROM.
Screencap from bikerscout.net
Biker Scout Pin-Stripe Measurements
BLACK PINSTRIPE 1/8 inch
Hump lines 4 x 8 x 4 = 16.0
Rank bars 1.25 x 6 = 7.5
Boot holster 1.0 x 5 = 6.0
Total = 29.5
RED PINSTRIPE 1/16 inch
Tanktopper stripe = 3.0
You will probably want to refer to our plaster casting , vacuumforming sections, and fiber-glassing to make your final parts.
-end section
©2010 Studio Creations - All Rights Reserved


